
This recipe for Royal Icing is perfect for decorating cut out sugar cookies for any holiday or celebration! The texture we use will easily outline and flood your cookies with icing. And it's just sweet enough to be delicious, but not too sweet that you'll have a toothache!

Royal icing is a sweet icing that sets in about 1-2 hours; which makes them perfect for decorating sugar cookies! It has a shiny gloss once it dries, sets soft, and can be made ahead of time and frozen. This recipe for royal icing does not use egg whites, but meringue powder.

The Coined Breakdown
- Total Cost per cookie iced: $0.13
- Total Cost (for about 60 cookies): $8.09
- Those Other Guys: $12.99 per batch
Ingredients

- Powdered Sugar - The base of most icing recipes! Some people say you need a specific brand for royal icing, but I've tested this with all kinds. I think any brand will work with the right technique.
- Meringue Powder - Meringue powder is a substitute for raw egg whites, made from pasteurized dried egg whites. Using meringue powder eliminates the salmonella risk and helps with icing hardening. You can find this at grocery stores (in the cake decorating aisle) or Amazon.
- Cream of Tartar - A pinch of cream of tartar helps with icing stabilization!
- Corn Syrup - A small teaspoon of corn syrup lends to a shiny royal icing once it dries. You don't need a ton.
- Clear Vanilla - I recommend clear vanilla so the icing will stay snow-white; it also helps the gel coloring shine more. If you don't have clear vanilla and want to avoid discoloring the icing, you can leave it out.
- Warm Water - This thins out the icing to the perfect consistency. A little goes a long way in this recipe.
This Royal Icing is Great for Flooding and Piping
You can use the texture of this icing for piping letters, outlining the cookie, and flooding in the design. If you're making gingerbread houses, royal icing can be used as the glue!
With gel food coloring, you can decorate for the following holidays/occasions:
Christmas Sugar Cookies
Halloween Sugar Cookies
"Birthday Cake" Sugar Cookies
How to Make Royal Icing at Home

Step 1: Start out by whisking the meringue powder with warm water until light and fluffy.
This "activates" the meringue powder to create the texture of whisked egg whites.

Step 2: Add the powdered sugar, clear vanilla extract, light corn syrup, and cream of tartar into the mixing bowl.
Mix in a stand mixer using a whisk attachment or paddle attachment until the icing comes together. If it needs a little help combining, add 1 tablespoon of warm water.

Step 3: Once the icing is nice and thick, this is where you'll color the icing.
When it reaches the hue you want, add tiny amounts of water to the bowl (about ¼ teaspoon at a time) until a drizzle of icing combines back into the bowl in about 10-15 seconds.

Step 4: Add each color to an icing bag, and cut a small hole into the tip.
Start by outlining each cookie with a thin line of color. This helps avoid the icing running over the sides of the cookie.
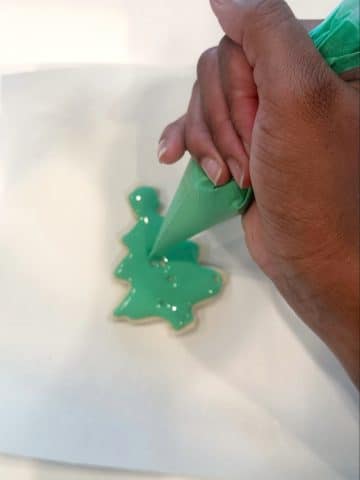
Step 5: Fill in the remainder of the cookie with icing. Use the tip of the bag to make sure every part of the cookie is covered.

Step 6: Finally, let the decorated cookies dry for 1-2 hours. Once they're fully set, you're good to serve or package up!
Recipe Pro Tips
- Start with a great base cookie recipe. For sugar cookies that bake up nice and flat with no spreading, try my Cut Out Sugar Cookies! This icing also pairs well with shortbread cookies or gingerbread cookies (and the glue for gingerbread houses.)
- Color the icing beforehand. Color the icing before adding more water to thin it out (see Tip #3). If you're doing multiple colors, separate the royal icing into different bowls. Keep in mind that the color shades will deepen as the icing settles!
- Use the "15-second test". While adding ¼ teaspoons of water to the icing at a time to thin it out, use the "15-second test" to know when the royal icing is ready to go. It should be thin enough where if you drizzle a little bit back into the bowl, it will take 10 - 15 seconds to completely melt back into the rest of the icing.
- Be careful with the added water! Don't add too much water at a time - even 1 full teaspoon could take the icing from good to way too runny. I recommend about ¼ teaspoon (or you can dip your spatula into a glass of water before stirring it in.)
- Cover the icing bowls when not in use. Especially when you're using multiple bowls of icing for different colors - if you aren't actively using a bowl of royal icing, cover it with a damp paper towel or kitchen towel. That way they won't dry out and crust over.
Recipe FAQs
Nope! It dries smooth and shiny, but it won't break your teeth or anything when you bite into it. It also sets well enough to where you won't smear any designs when you touch it.
You most certainly can. Homemade Buttercream icing has a more creamy texture, so I wouldn't recommend for fine detailed decorations, but it tastes amazing! It's all up to your preference for the cookie.
It could've dried too slow - which usually happens in a warm, humid climate/kitchen - or the icing could have been over-mixed. Just make sure to mix for no more than 5 minutes using a stand mixer, and then whisk by hand from that point on.
If you feel like your icing is drying too slow, use a clean kitchen fan placed about 4-6 inches away from the cookies. You don't want to put direct air on them.
This icing keeps well in the refrigerator (for about 2 weeks.) Simply store in a tightly sealed icing bag that has been placed in an airtight container.
Yes - royal icing freezes well.
Add the icing to icing bags, seal well, and place the sealed bags in an airtight container or freezer bag.
Freeze for up to 2 months. When you're ready to decorate, thaw overnight in the refrigerator. Finally, let the icing bags come to room temperature on the counter.
Other Tasty Sweets You'll Love!


If you tried this Royal Icing Recipe, or any other recipe on my website, please leave a star rating and let me know how it went in the comments below. I love hearing from you! Thanks for visiting!

Easy Royal Icing
Equipment
- Stand Mixer with whisk attachment or paddle attachment
- Whisk
- Silicone Spatula
- Small Mixing Bowls if coloring icing
- Spoons if coloring icing
- Icing Bags
- Kitchen Scissors
Ingredients
- 5 tablespoons meringue powder
- 8 - 10 tablespoons warm water divided
- 16 ounces powdered sugar 1 pound
- 2 teaspoons clear vanilla extract optional
- 1 teaspoon light corn syrup
- ½ teaspoon cream of tartar
- gel food coloring optional - if coloring the icing
Instructions
Plain White Royal Icing
- Using a handheld whisk, whisk together the meringue powder and ¼ cup of warm water in a mixing bowl until bubbly and light.5 tablespoons meringue powder, 8 - 10 tablespoons warm water
- Pour in the powdered sugar, vanilla extract, corn syrup, and cream of tartar.16 ounces powdered sugar, 2 teaspoons clear vanilla extract, 1 teaspoon light corn syrup, ½ teaspoon cream of tartar
- Mix for five minutes using a stand mixer (with a whisk or paddle attachment), until the icing comes together. Scrape down the sides, if needed, halfway through with a silicone spatula.
- If the icing still isn't coming together, add 1 more tablespoon of warm water while mixing. Once this step is done, it will be thick and smooth.
- If you ARE coloring your icing: Stop here and go to the next section of instructions.If you are NOT coloring your icing: continue on to the next step in this section.
- Whisk in a ¼ teaspoon of warm water at a time, using a handheld whisk/silicone spatula, until the royal icing is silky smooth. You want to use the "15-second test": Stick a silicone spatula into the icing, and then drizzle it back into the bowl. Time how long it takes for the icing drizzle to fully re-incorporate into the rest.Aim for 10-15 seconds for the perfect consistency. Remember, add small amounts of water at a time; you can always add more, but you can't take it away!
- Once the 15-second test has been passed, you're ready to add everything to an icing bag, cut a small hole in the tip, and decorate. See the recipe notes for extra decorating tips. Enjoy!
Colored Royal Icing
- If you're coloring your icing, separate them into smaller mixing bowls.
- Color each bowl using get food coloring. Note: the color will deepen slightly as it settles and dries.gel food coloring
- Once each bowl is colored to your desired hue, go ahead and add a ¼ teaspoon of warm water at a time to each bowl. Incorporate it using a handheld whisk/silicone spatula until it passes the "15-second test".This is where you stick a silicone spatula into the icing, and then drizzle it back into the bowl. Time how long it takes for the icing drizzle to fully re-incorporate into the rest.Aim for 10-15 seconds for the perfect consistency. Remember, add small amounts of water at a time; you can always add more, but you can't take it away!
- Once the 15-second test has been passed, you're ready to add each color to icing bags, cut a small hole in the tip, and decorate. See the recipe notes for extra decorating tips. Enjoy!
Notes
- If you're coloring your icing, go ahead and separate into smaller bowls and color each bowl using gel food coloring. The shade will slightly darken after it sets completely.
- Add ¼ teaspoon of warm water at a time to each bowl, incorporating it using a hand whisk/silicone spatula until it passes the "15-second test".
- You should be able to stick the spatula/whisk into the bowl, lift it up, and drizzle the icing back into the bowl. Time how long it takes for the drizzle to fully incorporate into the rest of the icing.
- If you're in between 10-15 seconds, you're ready to go!


Sarah Hunter says
I already left a comment on the Valentine's day cookies, so this will be all about icing! The recipe was incredibly detailed, and I love that you explained why we do certain steps and use certain ingredients. It colored very easily with gel food color from Amazon and did not dry hard and crunchy at all! It was solid, but still soft when you bite into the cookie. My new go-to recipe!
Shani H. says
Yay! Thank you Sarah.
Cynthia says
This was so easy to make!
Shani H. says
Right?! Thank you for leaving a comment Cynthia!